The MCP4251 is a dual digital potentiometer that lets a microcontroller adjust resistance programmatically, replacing a mechanical trimmer with an SPI-controlled component. It ships in 5 kΩ, 10 kΩ, 50 kΩ, and 100 kΩ versions. The MCP4251-103, for example, is the 10 kΩ part, and with its 8-bit wiper it resolves into steps of \(10{,}000/256\approx39\,\Omega\).
[PHOTO PLACEHOLDER: MCP4251 chip or breakout board with pins labeled]
MCP4251 Pinout
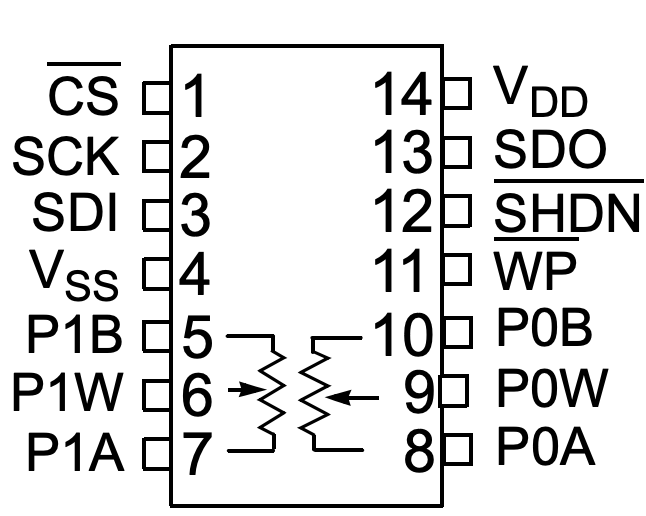
- VDD: power supply (2.7 V to 5 V)
- GND: ground
- CS: chip select (active low)
- SCK: serial clock
- SI: serial data input
- SO: serial data output
- WP: write protect (active low)
- PA0, PA1, PB0, PB1, PW0, PW1: potentiometer terminals (A, B, and the two wipers)
Required Materials
Hardware
- Arduino UNO or compatible board
- MCP4251 digital potentiometer
- Breadboard and jumper wires
Software
- Arduino IDE
- MCP4251 Arduino library
Wiring the MCP4251 to the Arduino
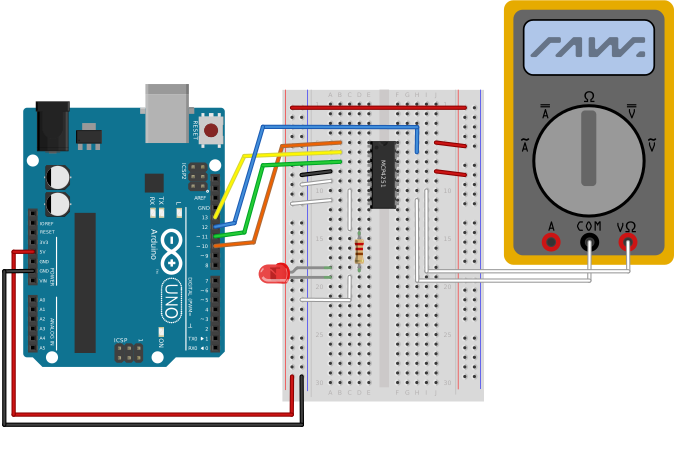
Connect the MCP4251 to the Arduino as follows:
- VDD to 5 V on the Arduino
- GND to GND on the Arduino
- CS to digital pin 10 on the Arduino
- SCK to digital pin 13 on the Arduino
- SI to digital pin 11 on the Arduino
- SO to digital pin 12 on the Arduino
- WP to 5 V on the Arduino
- PA0, PA1, PB0, PB1, PW0, PW1 to the peripheral being controlled
Basic Example Program
To use the MCP4251, first install the library in your Arduino libraries folder:
Then create a new sketch and use the following code to control the MCP4251:
#include <MCP4251.h>

MCP4251 digipot;

void setup() {

    pinMode(MCP4251_CS_PIN, OUTPUT);
    digitalWrite(MCP4251_CS_PIN, HIGH);

    SPI.begin();

    delay(100);

    digipot.setValue(0, 144); // Set pot 0 to 144/511
    digipot.setValue(1, 0);   // Set pot 1 to 0/511
}

void loop() {

    delay(1000);
}
Calibrating and Using Real Resistance Values
The MCP4251 library also allows working directly in resistance values instead of raw wiper positions. To get accurate readings, calibrate against an ohmmeter first:
- Pick a random wiper value between 0 and 511.
- Set it with digipot.setValue(0, <random number>).
- Measure the resulting resistance with an ohmmeter.
- Repeat steps 1-3 about 20-25 times, recording the pairs in a table.
- Feed the recorded values into calibrate/calibrate.py and run the script.
- Copy the resulting MCP4251_CALIBRATE_A and MCP4251_CALIBRATE_B constants into MCP4251.h.
Once calibrated, the library can be used with real resistance values directly:
#include <MCP4251.h>

MCP4251 digipot;

void setup() {

  pinMode(MCP4251_CS_PIN, OUTPUT);
  digitalWrite(MCP4251_CS_PIN, HIGH);

  SPI.begin();

  delay(100);

  digipot.setResistance(0, 3.2); // Set Pot0 to 3.2 kOhm
}

void loop() {

  delay(1000);
}