The MCP4251 is a dual digital potentiometer that allows resistance to be adjusted programmatically via a microcontroller, providing an alternative to traditional mechanical potentiometers. The chip typically exists in 5kΩ, 10kΩ, 50kΩ and 100kΩ versions. The MCP4251-103 for example has 10kΩ and with 8 bit this results in 10.000 / 256 = 39Ω increments.
Materials Needed
- Arduino board
- MCP4251 digital potentiometer
- Breadboard and jumper wires
MCP4251 Pinout
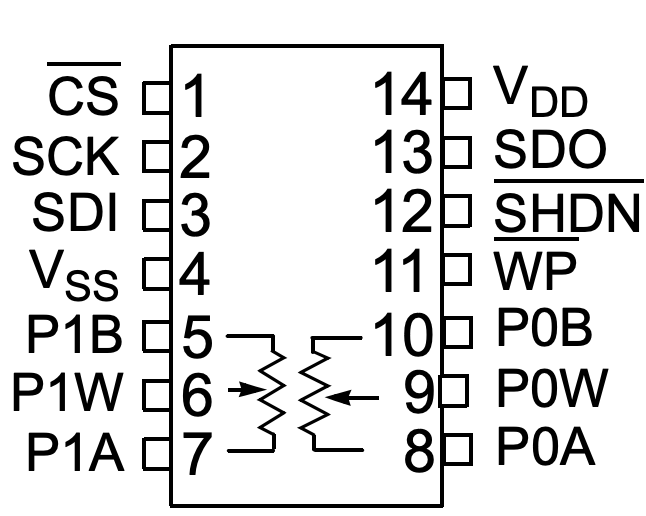
- VDD: Power supply (2.7-5V)
- GND: Ground
- CS: Chip Select (active low)
- SCK: Serial Clock
- SI: Serial Data Input
- SO: Serial Data Output
- WP: Write Protect (active low)
- PA0, PA1, PB0, PB1, PW0, PW1: Potentiometer terminals (A, B, Wipers)
Wiring the MCP4251 to the Arduino

Connect the MCP4251 to the Arduino as follows:
- VDD to 5V on the Arduino
- GND to GND on the Arduino
- CS to Digital Pin 10 on the Arduino
- SCK to Digital Pin 13 on the Arduino
- SI to Digital Pin 11 on the Arduino
- SO to Digital Pin 12 on the Arduino
- WP: to 5V on the Arduino
- PA0, PA1, PB0, PB1, PW0, PW1: to the utilized peripheral
Basic Example Program
To utilize the MCP4251, first install the library in your Arduino libraries folder:
Then, create a new Arduino sketch and use the following code to control the MCP4251:
#include <MCP4251.h>

MCP4251 digipot;

void setup() {

    pinMode(MCP4251_CS_PIN, OUTPUT);
    digitalWrite(MCP4251_CS_PIN, HIGH);

    SPI.begin();

    delay(100);

    digipot.setValue(0, 144); // Set pot 0 to 144/511
    digipot.setValue(1, 0);   // Set pot 1 to 0/511
}

void loop() {

    delay(1000);
}
Utilizing Resistance Values in the Program
The MCP4251 library enables the use of actual resistance values. To achieve accurate readings, follow these calibration steps using an ohmmeter:
- Take a random number between 0 and 511.
- Set the potentiometer value using digipot.setValue(0, <random number>).
- Measure the resulting resistance with an ohmmeter.
- Repeat steps 1-3 approximately 20-25 times, recording the values in a tabular format.
- Enter these recorded values into calibrate/calibrate.py and execute the script.
- Update the MCP4251_CALIBRATE_A and MCP4251_CALIBRATE_B parameters in the MCP4251.h file from the previous output.
Once calibration is complete, you can utilize the library to work with precise resistance values as needed.
#include <MCP4251.h>

MCP4251 digipot;

void setup() {

  pinMode(MCP4251_CS_PIN, OUTPUT);
  digitalWrite(MCP4251_CS_PIN, HIGH);

  SPI.begin();

  delay(100);

  digipot.setResistance(0, 3.2); // Set Pot0 to 3.2 kOhm
}

void loop() {

  delay(1000);
}